etcd NOSPACE: Recovering a Kubernetes Control Plane Without kubectl
If your on-prem cluster is down right now, start here. etcd raised a NOSPACE alarm, froze every write, and took the API server with it. Every guide tells you to kubectl exec into the etcd pod, but kubectl is exactly what’s broken. The way in is SSH and crictl. Jump straight to the fix.
It was a regular working day when the first alert landed. Nothing about it looked unusual. I’d worked through alerts like it plenty of times before, and they were usually a quick look and a quick fix.
Then I ran kubectl get nodes. The command just hung. I ran it again and it returned, slowly. Something was off but not obviously broken. Over the next few minutes kubectl became increasingly unreliable, and commands that worked on one attempt would hang on the next. Then the errors started landing consistently:
Unable to connect to the server: net/http: TLS handshake timeout
Unable to connect to the server: EOF
Eventually kubectl stopped responding altogether.
This was a production, on-prem Kubernetes cluster. Three master nodes, high availability, the kind of architecture you build specifically so one node going down doesn’t take everything with it. Right now all three masters were effectively unreachable. The API server was down, and kubectl, my primary tool for everything Kubernetes, was completely useless.
I didn’t know what was wrong yet. What I did know was that something had gone very wrong at a layer deeper than I usually have to look.
Here’s what I found, what didn’t work, and the recovery that did.
What Was Actually Breaking
The error messages were misleading. A TLS handshake timeout looks like a network problem. Or a certificate issue. Or maybe the API server itself had crashed. I went through that checklist: network connectivity between nodes was fine, certificates hadn’t expired, and CPU and memory on the nodes looked normal.
Then I looked at the etcd container logs.
That’s when I saw it: NOSPACE.
The etcd container was restarting every few seconds. In the logs between restarts, the same alarm repeated: the database had exceeded its storage limit, so etcd had frozen all writes. No writes meant the API server couldn’t record any state changes, couldn’t serve requests, and couldn’t function.
I checked the disk usage on all three master nodes:
du -sh /var/lib/etcd
- Master node 1: 1.1G
- Master node 2: 2.1G
- Master node 3: 2.4G
Three nodes in the same cluster, with databases that were wildly different sizes. That asymmetry alone told the story: these databases had never been compacted and never been defragmented. They had just grown, revision by revision, quietly, until the biggest one hit the limit and took the whole control plane down with it.
Why This Happens: etcd Compaction Explained Simply
etcd is the brain of a Kubernetes cluster. Every resource you create, every label you add, and every pod that starts or stops gets written to etcd. It is the source of truth for the entire cluster state.
Every change creates a new revision, a numbered snapshot of what the cluster state looked like at that moment. etcd keeps every revision forever unless you explicitly tell it to clean up. This design is intentional, because it enables features like watch notifications and rollback. But it also means that in a busy cluster with no maintenance configured, the database grows continuously.
Compaction is the process of telling etcd: “You can forget everything before revision X. Those old snapshots are no longer needed.” It removes the historical revision records and frees up logical space inside the database.
Compaction alone isn’t enough to reduce disk usage, though. After it marks old records as deleted, etcd’s database file still occupies the same size on disk. It simply has empty pages where the deleted records used to be. That’s where defragmentation comes in: defrag physically rewrites the database file and reclaims the space that compaction made available.
When the database hits its size limit (2GB by default), etcd raises the NOSPACE alarm and stops accepting any writes. The API server tries to write state, can’t, fails, and restarts. kubectl sends requests to the API server, gets no response, and times out. The whole control plane seizes up.
So why didn’t --auto-compaction-retention save us? Because it wasn’t configured. In many kubeadm clusters, automatic compaction is not enabled by default. Nobody added it during cluster setup, and nobody noticed the database growing.
The Dead End: Why the Standard Fix Didn’t Work
Every Stack Overflow answer for etcd NOSPACE starts with the same step:
kubectl exec -it <etcd-pod-name> -n kube-system -- sh
I couldn’t do that. kubectl was dead and the API server was down. kubectl exec requires the API server to route the request to the container runtime on the node, and without it the command goes nowhere. I was stuck outside a burning building without a key, and every guide was telling me to use the front door.
I tried everything in the normal playbook. kubectl get pods -n kube-system timed out. kubectl describe pod etcd-master-1 -n kube-system timed out. Every kubectl command ended the same way.
Then I remembered that etcd is a static pod, and static pods are different from regular pods. Regular pods are scheduled by the Kubernetes scheduler, tracked by the API server, and managed through the control plane. Static pods are defined by YAML manifests placed directly on the node at /etc/kubernetes/manifests/, and they are started directly by kubelet, the agent running on each node, without any involvement from the API server.
This means etcd doesn’t need the API server to run. It was running right now, on the nodes, restarting every few seconds, completely independent of the broken control plane above it. And if etcd is running directly on the node, then I can reach it directly on the node: no kubectl, no API server, none of the Kubernetes abstraction layer.
That’s what crictl is for.
crictl is a command line tool that talks directly to the container runtime on a node, which in this case was containerd. It bypasses the entire Kubernetes API. If a container is running on a node, crictl can see it, exec into it, and interact with it regardless of whether the Kubernetes control plane is healthy or dead.
The door was never the front door. It was SSH.
The Fix
Step 1: SSH into a master node and find the etcd container
crictl ps | grep etcd
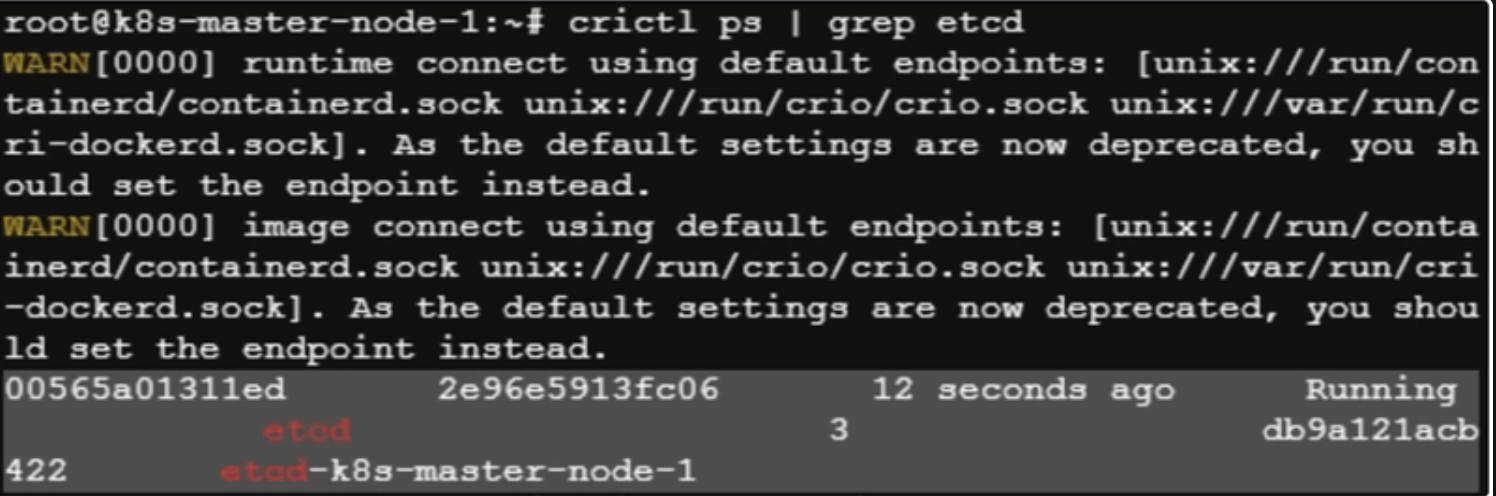
You’ll see the etcd container ID, its age (a few seconds if it’s crash-looping), and its restart count. Note the container ID, because you need it for the next step.
Step 2: Get a shell inside the etcd container
crictl exec -it <etcd-container-id> sh
This drops you into a shell inside the running etcd container. No kubectl needed.
Step 3: Check the current revision and confirm the alarm
etcdctl --endpoints=https://127.0.0.1:2379 \
  --cert=/etc/kubernetes/pki/etcd/server.crt \
  --key=/etc/kubernetes/pki/etcd/server.key \
  --cacert=/etc/kubernetes/pki/etcd/ca.crt \
  endpoint status -w json
A few notes on these flags. --endpoints points to the local etcd member. --cert and --key are the server certificate and key used for mTLS authentication. --cacert is the CA certificate that signed them. You need all three because etcd requires mutual TLS and will not accept unauthenticated connections, even from localhost.
The JSON output shows you the revision number and the NOSPACE error explicitly.
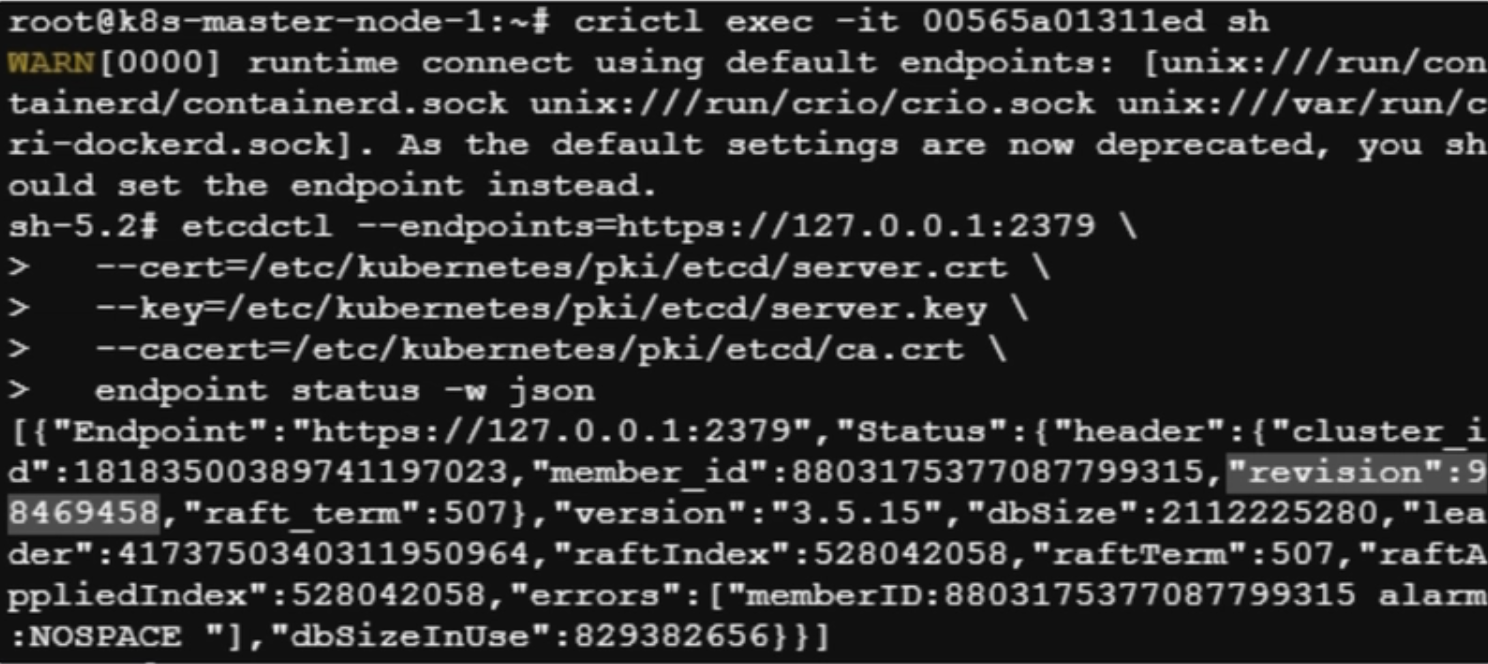
Note the revision value, because that’s what you’ll compact to. Also compare dbSize (2.1GB, the actual file size) against dbSizeInUse (829MB, the data actually needed). That gap of over 1.2GB of wasted space is exactly what compaction and defrag will reclaim.
Step 4: Compact to the current revision
etcdctl --endpoints=https://127.0.0.1:2379 \
  --cert=/etc/kubernetes/pki/etcd/server.crt \
  --key=/etc/kubernetes/pki/etcd/server.key \
  --cacert=/etc/kubernetes/pki/etcd/ca.crt \
  compact 98469458
This tells etcd that everything before revision 98469458 can be discarded. All those historical snapshots of cluster state that had accumulated over months were gone.
Step 5: Defrag to physically reclaim the space
etcdctl --endpoints=https://127.0.0.1:2379 \
  --cert=/etc/kubernetes/pki/etcd/server.crt \
  --key=/etc/kubernetes/pki/etcd/server.key \
  --cacert=/etc/kubernetes/pki/etcd/ca.crt \
  defrag
Compaction marked the data as deleted. Defrag actually removes it by rewriting the database file. Run this on one member at a time, since defrag blocks that member while it runs.
Step 6: Disarm the NOSPACE alarm
etcdctl --endpoints=https://127.0.0.1:2379 \
  --cert=/etc/kubernetes/pki/etcd/server.crt \
  --key=/etc/kubernetes/pki/etcd/server.key \
  --cacert=/etc/kubernetes/pki/etcd/ca.crt \
  alarm disarm
Compacting and defragging frees the space, but the alarm stays armed until you clear it. Until then, etcd keeps refusing writes even though the database is now well under the limit. This step is easy to forget and it is the one that actually unblocks the cluster.
Step 7: Verify disk usage and repeat on all master nodes
du -sh /var/lib/etcd

From 2.4GB down to 434MB. Then exit, SSH into master node 2, and repeat the entire process. Then master node 3. Each etcd member keeps its own copy of the database, so you have to defrag all of them.
Step 8: Watch the cluster come back
Once all three nodes are defragmented and their alarms are disarmed, etcd becomes healthy again. As soon as etcd accepts writes, the API server reconnects and starts serving requests. Within a minute or two, kubectl get nodes returns output. The control plane is alive.
How to Never Let This Happen Again
Enable automatic compaction. Open /etc/kubernetes/manifests/etcd.yaml on each master node and add this flag to the etcd command:
- --auto-compaction-retention=1h
This tells etcd to compact every hour, discarding revisions older than one hour. kubelet restarts etcd automatically when it detects the manifest change, so no further intervention is required.
Check Your Own On-Prem Cluster Right Now
This takes sixty seconds, and it’s worth doing before you close this tab. SSH into any master node and run:
# Is auto-compaction actually configured?
grep -- --auto-compaction-retention /etc/kubernetes/manifests/etcd.yaml \
  || echo "NOT CONFIGURED"

# How big is the database today?
du -sh /var/lib/etcd
Three possible outcomes:
- The flag is there and the database is small. Nothing to do. Someone set this up properly.
- The flag is missing but the database is well under 2GB. You have time. Add the flag today and you never meet this incident.
- The flag is missing and the database is close to 2GB. Add the flag, then compact and defrag each member during a quiet window, using the steps above. Doing it on your schedule is far better than doing it at 2am on someone else’s.
What I Learned
The obvious lesson is to configure auto-compaction. If I’d added --auto-compaction-retention=1h during cluster setup, this incident would never have happened.
The deeper lesson is about the Kubernetes abstraction layer and what to do when it fails you.
I spent the first few minutes of this incident trying every kubectl variant I could think of, because that’s what you do. kubectl is how you interact with Kubernetes. When kubectl doesn’t work, the instinct is to assume you’re holding it wrong, or that a certificate expired, or that kubectl itself is broken.
The better question was: why is kubectl not working, and what still works when kubectl can’t?
The answer is that kubectl is only a client for the Kubernetes API. When the API is down, kubectl is useless, but everything below the API is still running. Static pods still run. crictl still talks to the container runtime. SSH still works. The cluster’s own database is sitting right there on the node, waiting for someone to reach it directly.
crictl is not a tool most Kubernetes engineers reach for in normal operations. It’s a break glass tool for exactly this scenario, when the control plane is broken and you need to get to a container the API server can’t help you reach. Every engineer who runs on-prem Kubernetes should know it exists and know when to use it.
The runbook for etcd NOSPACE is well documented across the internet. What isn’t documented is what to do when that runbook assumes kubectl works and it doesn’t. That’s the gap this incident sits in, and now you know how to cross it.
Your Turn
Auto-compaction is the kind of setting that stays invisible until the day it isn’t. Nobody decides against it. It just never comes up while the cluster is being built, and then the database grows quietly for months while every dashboard stays green.
A few questions I’m still chewing on, and I would take input on any of them:
- What’s your compaction retention set to? I went with
1h. Some teams run6h, others24h. I haven’t found a convincing argument for where the line should be. - Do you alert on etcd database size? Recovering from
NOSPACEis straightforward once you know the trick. Never reachingNOSPACEis better, and that’s just a threshold onetcd_mvcc_db_total_size_in_bytesagainst your quota. - What’s your break glass tool? crictl was mine here. If your control plane died tomorrow, what’s the first thing you’d reach for once kubectl stopped answering?
Mostly, though, I’d rather hear your version than have the last word on mine. If your control plane has ever gone quiet on you, whatever the cause turned out to be, I’d love to know how you got back in. The thing that breaks is different every time. The way back in is the part worth collecting, and nobody collects it alone.